~ AROUND THE YEAR WITH COOKIE MOLDS ~
February
Valentine Hearts, Flowers, and Chocolates
My Cookie Molds Books!


Contents
Valentine Hearts, Flowers, and Chocolates
Recipe: Milk Chocolate Cherry Cookie Tarts
Recipe: Dark Chocolate Cookies with Molded Marzipan Topping
Tip: Working with Marzipan
Recipe: Cinnamon Cocoa Molded Cookies
Tip: More about Trimming Cookies
Recipe: I-Love-You Cookies
Tip: Texture and Molded Cookies
Recipe: Layered Chocolate Orange Valentines
Tip: Preparing Cookie Molds
Recipe: "Sweets for the Sweet" Sugar Cookies
Tip: Using Multi-Cookie Pans or Molds
Tip: Using Found Objects to Mold Cookies
February’s Cookie Molds

Valentine Hearts, Flowers, and Chocolates

Poor St. Valentine! Removed from the Roll of Saints without so much as a Dear John letter!
It’s not possible, though, to get rid of the idea of love. It renews everything, and spring reminds us of that renewal.
Here on San Juan Island, we may have mild winters or hard ones, but the first flowers of spring are equally welcome in either case. Crocuses pop up in my yard overnight, and it’s the same every year—one morning, I look at the window to check out the window to check for snow and see them instead.
That doesn’t mean that cold weather is past, but it’s a welcome sight for all that. And after crocuses, we get daffodils, tulips, narcissus, hyacinth, and others that I don't even know the names of. They smell wonderful. By the end of February, the cherry trees will be blooming...and the year begins again.
Decades ago, I had a grandmother who lived at 700 Spruce Street in Little Rock, Arkansas. Her house was on a large corner lot, and the cross street came through at an odd angle, so her yard was irregular in shape. She had planted every kind of daffodil and narcissus you can imagine, and as she got older, she let them go wild. In spring, the back yard was filled with thousands of flowers. I think the house is still there, but I have no idea if the flowers are. But they live on in my memory—a paradise of daffodils.
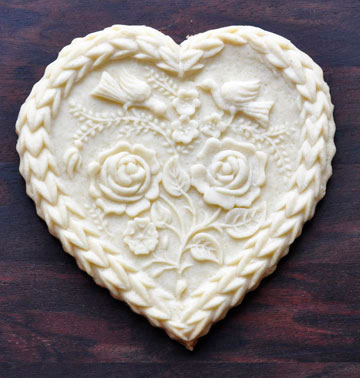
In addition to flowers, of course, we celebrate Valentine’s Day with heart-shaped symbols. The origin of this shape isn’t known, but everyone agrees that it goes back for centuries. And heart shaped cookie molds are very common, possibly because molded cookies are so often made for someone who is loved.
And what better time than to celebrate chocolate, as well! This month, we'll look at many versions of chocolate cookies—from white chocolate and mild cocoa flavors to the darkest possible chocolate. And for those who don't favor chocolate, there's a spice cookie and a special sugar cookie.

Recipe: Milk Chocolate Cherry Cookie Tarts
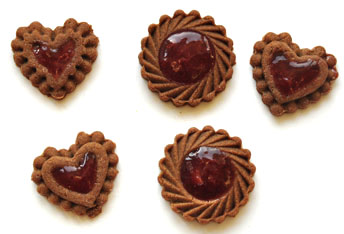
Do you remember milk-chocolate covered cherries? When I was first dating, that was the big-deal gift to get from a boyfriend on Valentine's Day. We've graduated to gourmet truffles now, and nostalgia, as they say, ain't what it used to be. Still, I remember the cherries fondly, and this cookie tart version is very good.
2 ounces (57 grams) baking chocolate
3/4 cup (170 grams) unsalted butter
1 large egg
1/2 cup (100 grams) sugar
1/4 cup (18 grams) nonfat dry milk
1/2 teaspoon salt
1/2 cup (118 milliliters) sweetened condensed milk
1 tablespoon cream
1 teaspoon vanilla extract
About 2 cups (280 grams) all-purpose flour
1. Warm the chocolate and butter together in a low oven or microwave until the chocolate is soft and the butter is melted. The chocolate may hold its shape when soft, so test with a spoon to avoid overcooking.
2. Stir the chocolate and butter together. Set aside.
3. Beat the egg in a large bowl until yolk and white are fully mixed.
4. Mix the sugar, nonfat dry milk, and salt.
5. Add the sugar mixture to the egg.
6. Mix the condensed milk, cream, and vanilla extract.
7. Add the milk mixture to the egg mixture.
8. Add flour slowly until the dough is solid enough to knead.
9. Knead in additional flour until the dough is the consistency of children's modeling clay.
10. Using a tart mold, press out cookie tart shells. Complete illustrated directions for using cookie tart shells are available in the November issue of this magazine.
11. Bake the cookies at 350°F (175°C) for ten to twelve minutes.
Fill with cherry jam, cherry spread mixed with cream cheese, or cherry pie filling.
Sweetened condensed milk is NOT the same as evaporated milk. It's available just about everywhere, but you do have to check labels to make sure you have the right product.
Recipe: Dark Chocolate Cookies with Molded Marzipan Topping
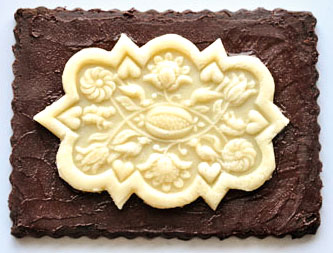
Valentine's Day demands chocolate, but chocolate and cookie molds aren't the best match in the world. If the chocolate is light enough that the pattern of the cookie is distinct, chocolate lovers are disappointed in the taste. There are many ways around this, and this recipe offers one more. It isn't actually a molded cookie. It's molded marzipan on a cookie. It's good. And surprisingly easy.
4 ounces (115 grams) baking chocolate
1/2 cup (115 grams) unsalted butter
1 large egg
3/4 cup (150 grams) sugar
1/2 teaspoon salt
2 tablespoons baking cocoa
2 tablespoons black coffee
1 teaspoon vanilla extract
1 teaspoon chocolate extract
About 2 cups (280 grams) all-purpose flour
Chocolate frosting or chocolate spread
Marzipan, commercial or homemade
1. Warm the chocolate and butter together in a low oven or microwave until the chocolate is soft and the butter is melted. The chocolate may hold its shape when soft, so test with a spoon to avoid overcooking.
2. Stir the chocolate and butter together. Set aside.
3. Beat the egg in a large bowl until yolk and white are fully mixed.
4. Mix the sugar, salt, and cocoa. Sift to remove lumps.
5. Add the sugar mixture to the egg.
6. Add the coffee, vanilla extract, and chocolate extract to the egg mixture.
7. Add the chocolate mixture to the egg mixture.
8. Add flour slowly until the dough is solid enough to knead.
9. Knead in additional flour until the dough is the consistency of children's modeling clay.
10. Roll and form the marzipan toppings. See following section for directions.
11. Roll the cookie dough to a uniform thickness. Cut rectangles or circles larger than your molded marzipan toppings.
12. Bake the cookies at 350 degrees F (175 degrees C) for ten to twelve minutes.
13. Cool the cookies and spread with frosting, spread, or topping to help stick the marzipan to the cookie.
14. Center a marzipan topping piece on each cookie and press very lightly.
For the chocolate spread, I used chocolate almond. Ice cream topping would also work.

Tip: Working with Marzipan
Marzipan is a mixture of ground almonds, sugar, and sometimes sugar syrup. If the texture is right, it's very easy to mold. If you make or buy marzipan that's too sticky, work in some sifted confectioner's sugar (icing sugar) until it is a little stiffer than children's modeling clay. If it's too dry, wrap it in a damp towel and microwave it for five seconds. I found I didn't need to prepare my cookie molds—the marzipan didn't stick to them. With different molds, the results might have been different, though.
If there are flaws in the design of the unmolded marzipan, you can use a water color brush, water, and a knife or clay tools to improve it. Cut excess off with a craft knife, and let the molded marzipan toppings dry a bit on a cookie cooling rack if necessary.
Recipe: Cinnamon Cocoa Molded Cookies
A spice cookie with a subtle chocolate flavoring. You may increase the chocolate and decrease the cinnamon to change the flavor balance.
1 cup (225 grams) unsalted butter
1 large egg
1/2 cup honey
1 teaspoon chocolate extract
1/2 teaspoon vanilla
1/2 cup (100 grams) sugar
1 tablespoon cinnamon
1 teaspoon cocoa
1/4 teaspoon salt
About 4 cups (560 grams) all-purpose flour (plain flour)
1. Melt the butter and set aside.
2. Beat the egg in a large bowl until yolk and white are fully mixed.
3. Mix the honey, chocolate extract, and vanilla extract. Add to the egg and beat until well mixed.
4. Mix the sugar, cocoa, cinnamon, and salt. Add to the egg mixture and beat until well mixed.
5. Add the melted butter slowly and beat until well mixed.
6. Add flour slowly until the mixture is solid enough to knead.
7. Transfer to your work surface and knead in more flour to make a soft, slightly sticky dough.
8. Wrap or cover the dough and refrigerate for up to half an hour—until it’s firm but still flexible.
9. Roll and form the dough
10. Refrigerate the cookies while you preheat the oven to 350°F (175°C), or lower for especially thick cookies.
11. Bake for 10 to 15 minutes or until the edges have slightly browned and the top has begun to firm up.
Tip: More about Trimming Cookies
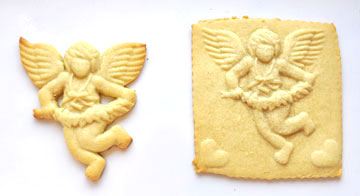
The December issue of this magazine included a discussion of trimming. Here's another example. In this case, the mold has hearts at the bottom corners, which makes it appealing as a square cookie, but there are a couple of problems. The mold is very deep, so that it's difficult to bake the cookie properly if the background is included. By the time the cupid's face is baked, the edges tend to be overcooked. Also, it makes a very large cookie, and—as you can see—it's not that easy to trim it straight. If I were doing it again, I'd cut a square of parchment paper as a guide, or use a large square cookie cutter
It's tempting to trim the dough flush with the cookie mold before you unmold the cookie—that will get you a straight edge every time. The problem is, it's harder to get the cookie out of the mold if you do. You have nothing to hang onto, and you don't have the weight of the extra dough pulling away from the mold. If you do this, you can often get the cookie started unmolding by pressing lightly at the edge, parallel to the face of the cookie, and pulling gently down as you do. Once you get the unmolding started, you have only to wait—the force of gravity is on your side.
The trimmed version is much easier, and either could be very attractive. The untrimmed one would be especially pretty if it were painted with cookie paint to make a real valentine.
Recipe: I-Love-You Cookies
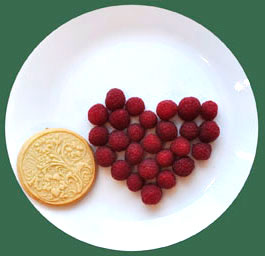
The flavors are white chocolate, honey, raspberry, and rose. The measurements in this recipe give a subtle flavor. You may use more rose water if you prefer, but be careful, or your cookies will taste unpleasantly perfume-y. Very good served with fresh raspberries.
4 ounces (114 grams) white chocolate
4 ounces (114 grams) butter
1 large egg, beaten
1/2 cup (100 grams) sugar
1/4 teaspoon salt
1/2 cup (120 milliliters) honey
2 tablespoons raspberry liqueur or syrup
1 tablespoon milk or cream
1 teaspoon rose water
1/2 teaspoon vanilla extract
About 4 cups (560 grams) all-purpose flour
1. Warm the chocolate and butter in a low oven or a microwave until the butter is melted and the chocolate is soft. The chocolate may hold its shape when softened, so test with a spoon when the butter is melted.
2. Stir the butter and chocolate together and set aside.
3. Beat the egg in a large bowl.
4. Mix sugar and salt. Add to the egg.
5. Mix the honey, raspberry liqueur, milk, rose water, milk, and vanilla extract. Add to the egg.
6. Slowly add the melted butter and chocolate.
7. Add flour slowly until the mixture is solid enough to knead. If you’re using an electric mixer, stop the mixer once or twice as you’re adding flour, and scrape the sides of the bowl to get all the flour mixed in.
8. Transfer the dough to a work surface and continue adding flour a little at a time until you have smooth, slightly sticky dough.
9. Roll and form the dough per the directions given for your mold, or the directions in my book, Baking with Cookie Molds.
10. Chill the cookies while you preheat the oven to 320°F (160°C).
11. Bake for 10 minutes or until slightly browned at the edges.

Tip: Texture and Molded Cookies
For some people, the ideal cookie is a soft, gooey, cakey morsel. Those can be great. However, molded cookies have to be a bit more solid than that—more like shortbread or gingersnaps.
Also delicious, just different.
For slightly cake-ier molded cookies, serve them warm.
Or, go the other way: make them thin, serve them at room temperature, and enjoy their crispness.
Or serve your cookies with fruit or ice cream, cocoa, tea, or coffee. Or mulled cider.
I do have a few cookie molds that seem to make cookies that are better to look at than to eat. For the most part, they're antique molds. These molds make large cookies, and often they're thick as well. This gives a chance for the cookie to have a beautiful design, but if you serve them, they're an awful lot of cookie for one person to eat. And of course, when you break them up, the beautiful design disappears.
It's a good idea to experiment with any mold/recipe combination before you serve it for a special occasion.
Recipe: Layered Chocolate Orange Valentines
1 cup (227 grams) butter
1 large egg
1/2 cup (120 milliliters) honey
2 teaspoons culinary orange oil
1 teaspoon natural orange flavoring
1/2 cup (98 grams) sugar
1/8 teaspoon salt
About 4-1/2 (630 grams) cups all-purpose flour
2 tablespoons baking cocoa
1. Melt the butter and set aside.
2. Beat the egg in a large bowl until yolk and white are fully mixed.
3. Mix the honey, orange oil, and orange flavoring. Add to the egg and beat until well mixed.
4. Mix the sugar and salt. Add to the egg mixture and beat until well mixed.
5. Add the melted butter slowly and beat until well mixed.
6. Add flour slowly until the mixture is almost solid enough to knead. Remove from the mixer and divide into two pieces, one about twice the size of the other.
7. Transfer the smaller piece to your work surface and knead in more flour to make a soft, slightly sticky dough.
8. Transfer the larger piece to your work surface and knead in the cocoa and enough flour to make a soft, slightly sticky dough..
9. Roll the dough in two layers as described in the November issue of this magazine, or in my book, Baking with Cookie Molds. The chocolate layer is the lower layer.
10. Form the cookies per the directions for your cookie mold.
11. Refrigerate the cookies while you preheat the oven to 320°F (160°C).
12. Bake for 10 to 15 minutes or until the edges have slightly browned and the top has begun to firm up.
You may substitute 2 teaspoons of finely grated orange peel for the orange oil, but it will show as a speckle in the cookie.
I recommend extra dark baking cocoa for maximum chocolate flavor. You may also add 1 tablespoon of shaved dark chocolate or finely chopped chocolate chips. If used, chocolate chips must be chopped finely enough that they won't poke through the pale top layer of dough and ruin the pattern.
Tip: Preparing Cookie Molds
A cookie mold that's properly prepared is one of the keys to success. But they're not all alike.
For most molds, I oil the surface of the mold very lightly, wiping off any oil that looks sparkly. The mold should have the kind of slight sheen that painters call "satin."
Then I use a fine-bristle pastry brush (Ateco makes a good one) to spread flour thinly over the surface of the dough.
The cookie almost always comes out of the mold beautifully, at least with my recipes.
However, a few molds just have to be different. Sometimes it's an unfinished wood mold or an unusually coarse pottery one.
If a difficult mold has very fine detail, I use just flour, no oil. The cookies will often have flour on the surface when they're unmolded, so I let them sit at room temperature until it's absorbed, usually about half an hour. You can also chill them and brush the flour off the surface. Some mold makers recommend powdered sugar or cornstarch for dusting molds. I prefer the flour, but you might prefer something else.
If the difficult mold has large flat areas, I use just oil, no flour. This has—so far—always been a coarse pottery mold, like terra cotta flowerpot material. I soak the surface with oil and let it sink in. Then I use it. So far, this has worked for me much better than flour.
The best thing to do is, try the main method first. A little oil on the mold, a little flour (or cornstarch or powdered sugar) on the dough. If this doesn't work, experiment.
Recipe: “Sweets for the Sweet” Sugar Cookies
1 cup (227 grams) butter
1 large egg
1 tablespoon milk
1 tablespoon white corn syrup
1 teaspoon vanilla extract
1 cup (200 grams) sugar
1/4 teaspoon salt
About 4-1/8 cups (575 grams) all-purpose flour
1. Melt the butter and set aside.
2. Beat the egg in a large bowl until yolk and white are fully mixed.
3. Mix the milk, corn syrup, and vanilla extract. Add to the egg and beat until well mixed.
4. Mix the sugar and salt. Add to the egg mixture and beat until well mixed.
5. Add the melted butter slowly and beat until well mixed.
6. Add flour slowly until the mixture is solid enough to knead.
7. Transfer to your work surface and knead in more flour to make a soft, slightly sticky dough.
8. Wrap or cover the dough and refrigerate for up to half an hour—until it’s firm but still flexible.
9. Roll and form the dough per the directions for your cookie mold, or the directions given in my book, Baking with Cookie Molds.
10. Refrigerate the cookies while you preheat the oven to 350°F (175°C), or lower for especially thick cookies.
11. Bake for 10 to 15 minutes or until the edges have slightly browned and the top has begun to firm up.
Tip: Using Multi-Cookie Pans or Molds
For the most part, I am not a fan of large cookie molds—often called "shortbread pans"—where the cookie is baked before unmolding. It annoys me that some online booksellers pair these molds with my book, because the book clearly says that most of these pans don't work well. I have no control at all over their pairings, so there's nothing I can do about it.
Pottery and metal shortbread pans can be made to work acceptably for other cookies, but I've never been happy with shortbread I've baked in one. Neither have any of my testers. I've tried different patterns, different brands, different recipes, different oven temperatures, different you-name-it, and the result is always one or another version of the same story: The cookie heaves, bubbles, and distorts during baking. Sometimes you can tell what the pattern was supposed to be, sometimes you can't.
Even when this problem is minimized, so that most of the pattern is replicated, the texture of the molded side is quite coarse—well, after all, it is the bottom of the cookie.
I got my best results by using multiple pie weight chains on top of the dough as it was baking, to minimize the bubbling and heaving. I used a round of parchment paper between the weights and the dough to keep the weights from sinking in. It definitely improved the look of the cookies, but I still preferred other techniques.
Other cookie dough besides shortbread can be baked in these pans with slightly better results, especially if the cookies are no thicker than about 1/4 inch. (Thinner shortbread had better results than thicker, as well.)
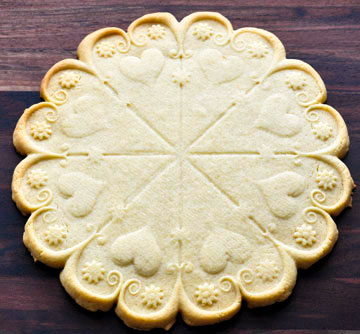
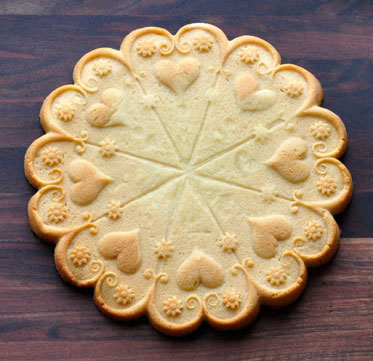
The cookies shown above were baked in a different kind of cookie molding pan, one made of silicone. I've had consistently better results with these pans than I've had with pottery or metal pans. However, they're not available in many patterns.
Shown above are two cookies from the same batch of dough. The one on the left was molded in the pan and baked on a cookie sheet. The one on the right was baked in the pan with pie weights to prevent heaving. In this case, though both techniques made delicious cookies, baking in the pan produced a more attractive result.
While each cookie was still warm, I divided it into segments with a pizza wheel.
The recipe used was the Anne's Lemon Cookies recipe from Baking with Cookie Molds.
Tip: Using Found Objects to Mold Cookies
Suppose you have something that looks like it might work as a cookie mold—but it isn't one. You might be curious to try it.
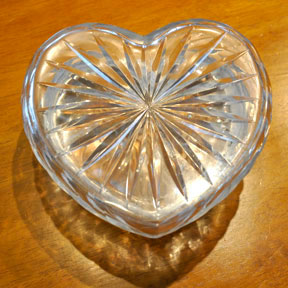
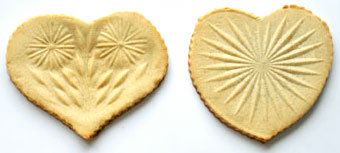
And it might work. However, be sure it's a food safe material, and that it doesn't have a bad taste—brass, for example, tastes pretty bad, unless it's lacquered. Using many objects for cookie molds is a fairly easy thing to do—just roll out the dough, brush it with flour, and press your object into it firmly. Then cut out your cookies with a pastry wheel, cookie cutter, or knife. Or lay another cookie mold lightly over the molded dough and use it as an outline guide. I can't speak for anyone else's recipes, but it works fine with mine.
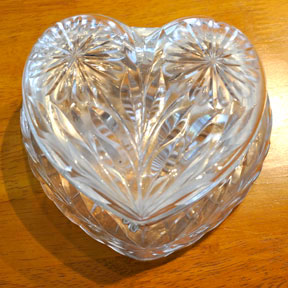
The candy dish I show in the photos above is one that caught my eye. Both the top and the bottom are fancy-cut glass, and it looked like it might have potential.
It's a dish with its own story—this one is about my other grandmother, not the daffodil one.
She was a very proper old lady when I knew her, and if family stories are true, she was proper even when she was young. Many years after she was gone, my father gave me this candy dish, which had been hers. I didn't need a candy dish, but I loved the story he told me about it.
It seems my grandfather had to travel during the Depression to earn a living. Since he had to leave his wife and children at home, he bought my grandmother a gun. She kept it in the candy dish. It's not a very large dish, so it must have been a small gun. She never used it, never needed to.
But the idea of my ladylike grandmother with a Saturday-night-special amuses me so much that I'll cherish the dish forever. It works pretty well as a cookie mold, too.
February’s Cookie Molds
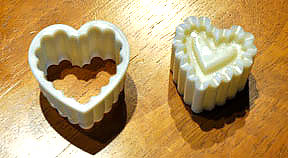

Heart and round cookie tart molds from Brown Cookie.
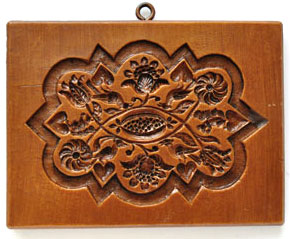
"Wedding Symbols" by House on the Hill
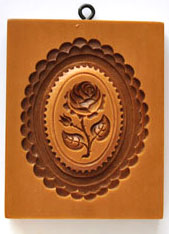
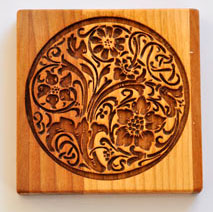
"Rose in Oval" by Springerle Joy
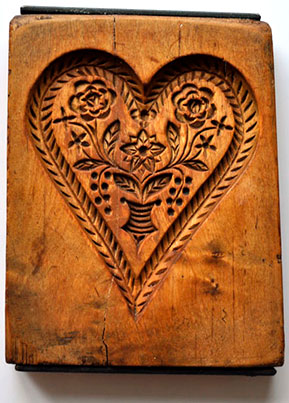
Antique heart cookie mold
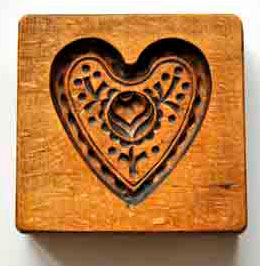
Small antique heart mold, circa 1910
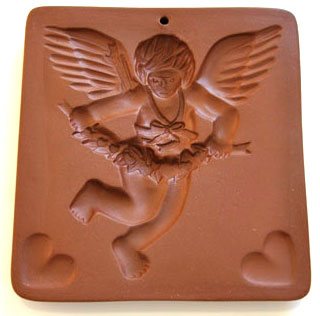
Cupid mold by Hartstone
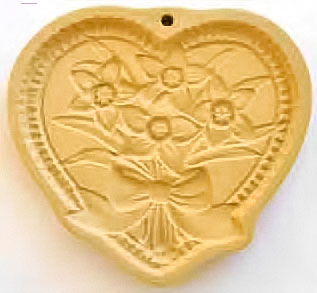
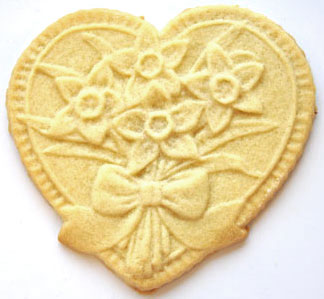
Daffodil heart, by Brown Bag Cookie Molds
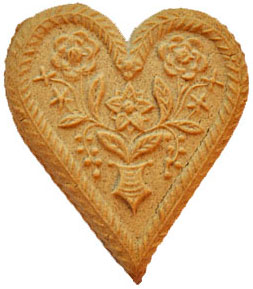
Flowers and Stems, by My Cookie Mold
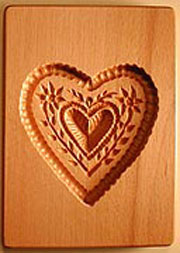
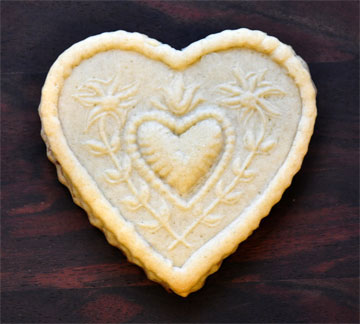
Edelweiss Heart, by HOBI Cookie Molds
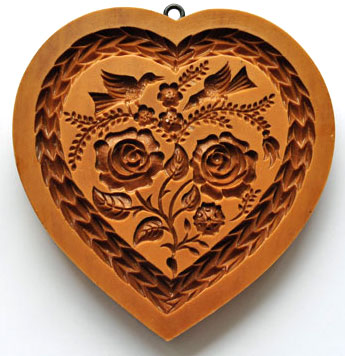
Heart with Two Birds, by Springerle Joy
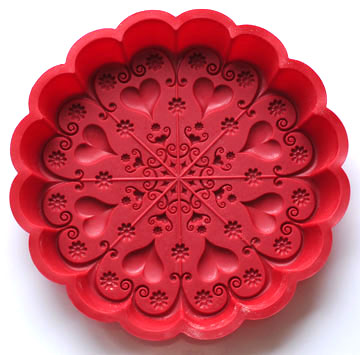
Kaleidoscope Heart Mold by Zanda Panda